I’m thankful for you and pizza (pizza card)

Video link https://youtu.be/XARFviLBSZM

Stamps:

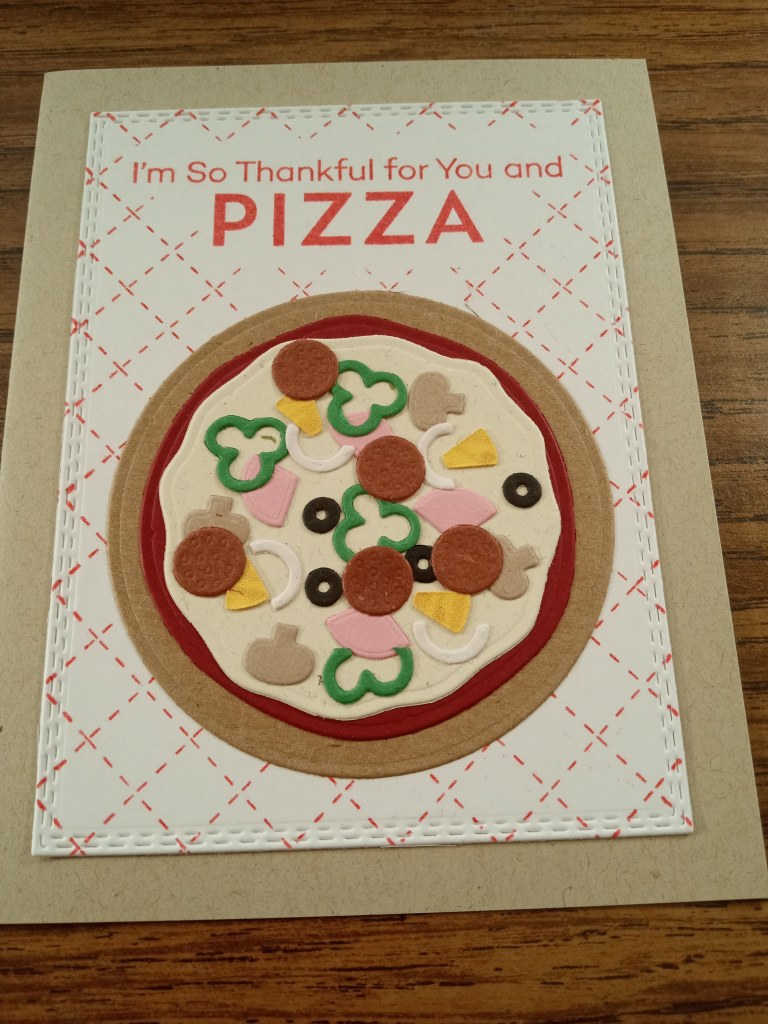
Stamp: My Favorite Things Pizza My Heat (no longer available new)

Die: My Favorite Things Pizza Maker (no longer available new)

currently available alternatives: 

Pizza seems to be out this year, so the food-themed Father’s Day sets currently are all about grilling.  For a similar vibe, check out Brutus Monroe Grill dies and Trinity Stamps Un-grill-ivable sentiments.

Stamp: Heartfelt Creations Hand-Stitched (no longer available new)

I really wanted buffalo check, though, and there are many alternatives.  Doodlebug makes paper, scrapbook .com has a stencil and a die, Simon Says Stamp has a stencil, Stampers Anonymous has Tim Holtz plaid stamps, and the list goes on.

Die: Gina Marie Designs double-stitched rectangle – current product

GMD is wholesalecraftingsupplies.com and prices are very reasonable

Ink: Altenew Crimson

Crisp Dye Ink line of oval pads is being phased out, but this is still available

Paper: Die cuts from random scraps, white panel from Strathmore Bristol smooth, card base is Neenah Desert Storm.  I get the card bases cut to 8.5 x 5.5 at thepapermillstore.com .  If you are making cards at volume, their pre-cut and folded white and ivory card bases and envelopes are big time-savers, although I think the smallest quantity you can get is 100 and most items come in 250.

Other supplies

Tiny needle-nose bottle for glue, because name-brand glue tubes are nice but not 36 times better than Elmer’s Extra Strong in a tiny bottle and that’s what the price difference is

https://amzn.to/3MZBLRu

Car chamois, because the name-brand craft “shammy” products are nicer, but this is cheaper and I can throw it away when it inevitably mildews in my humid climate.  Any auto-parts store or section would have something similar.  

https://amzn.to/4281tYg

Pressure tool: owl shaped dry erase magnet, because I think it’s cute and I could use the other seven to erase.  Any dry eraser would work the same, or a piece of felt glued to a wooden stamp block after you remove the stamp, if you do that to save space.  

https://amzn.to/3II8W9r

Tim Holtz stamping platform no longer available in the US, but I have a write-up here that covers some alternatives https://papercraftcrystal.com/2023/04/23/stamping-options/ 

Silicone cups for die pieces https://amzn.to/3IInx4T but any dollar store muffin tin would do, or even paper cupcake liners.  I like the separate cups because you can stack them up if you have to pause your project.

The craft pick that I use on dies is one I bought over 25 years ago, back when dry embossing meant brass stencils.  I got three for $5 and they’re still going strong.  It has a pokey end that would not work for jewels or sequins, but a wax-tip tool would handle those.

Round-up on bargain craft tools: https://papercraftcrystal.com/2023/05/06/finding-bargain-craft-tools/ and just glue https://papercraftcrystal.com/2023/04/22/cost-efficient-adhesive/

Amazon links are affiliate

Which paper really stands up to water?

I had an epic fail with trapped embossing and it made me think about the qualities of paper, particularly used with water-soluble mediums.  Paper interests me, as I’m sure it does many crafters, and one of the most interesting tours I’ve ever enjoyed was a paper mill in Wisconsin with a Club Scrap group.  

Paper is generally made using wood pulp, with higher-quality paper (especially watercolor paper) getting additional cotton lint.  The highest quality paper may be made from 100% cotton lint or even cotton textiles, which is described as “cotton rag”.  Cotton textiles have longer fibers than cotton lint.

Commercially-made, general use paper has additives, but the most important one for my topic is sizing.  Sizing stops ink from absorbing into the paper, bleeding out from its point of application.  Papers like toilet paper, facial tissue, and paper towels generally don’t have any sizing.  Copy paper, notebook paper, craft cardstock, and watercolor paper do have sizing, and that can be internal, external, or both.  Internal sizing means ingredients are added to the pulp as the paper is made, and external sizing is a coating applied to the surface of the paper.  Sizing can be manufactured (alkyl ketene dimer) or natural (gelatin, wheat starch).

As a crafter, the most important takeaway is that detergent breaks down sizing so if you wash your brushes or stamps with detergent, rinse thoroughly to avoid transferring detergent to your paper. 

Out of curiosity, I took three punched pieces from every variety of watercolor and mixed media paper I had on hand and put those in tiny jars with water to see what would break down fastest and slowest.  I threw in some copy paper, some Neenah 110 pound, some 100% cotton “resume paper”, and some bristol for comparison.  The pieces were a 1” circle, a tiny scalloped circle, and a heart… except some paper was too tough for the heart punch, so those got a 1/4” circle.  (These tiny jars are left from the Bonne Maman advent calendar and hold 30 g, about 1 ounce.)

Paper will break down in acid and heat.  I can’t imagine ever applying vinegar or lemon juice to a craft project, but I certainly do apply heat.  I put the jars of paper pieces and water on the heating plate for my slow cooker and brought them to about 200 degrees (the temperature of the average craft heat gun) for 10 minutes.

After 24 hours, the copy paper was visibly degrading.  Where the paper had been bent a little in the process of punching the 1” circle the paper was developing a hole, and paper fiber is visible in the water.  The other samples were intact, but I was interested to see that some were floating (had not become completely water-logged) and some had sunk to the bottom (fibers are water-logged.)  That’s not good or bad, all the papers are fine, but I want to know because I’m pretty heavy-handed, so I need paper that is going to stand up to my spills and mistakes!

Sinkers:

Neenah 110 lb

Strathmore Bristol

Mofuny Mixed Media

Arches watercolor 

Strathmore 100% cotton 32 lb

Distress watercolor

Distress heavy stock

Dylusions mixed media

Floaters:

Arteza watercolor

American Craft Vicki Boutin mixed media

Strathmore watercolor

I’m trying for a no-shopping year (and failing miserably, but that’s a separate topic) so I won’t be buying any paper, just trying to use up what I have.  I can’t help noticing, though, that American Crafts Vicki Boutin mixed media paper is nice.  It has a very smooth surface, nice body without being too heavy, and it takes watercolor beautifully.  I’m impressed with the Arteza watercolor paper as well, but I’m not a watercolor artist so its qualities are not quite what I’m looking for in paper.  The Vicki Boutin is pretty reasonably priced at scrapbook.com (https://www.scrapbook.com/store/ac-343917.html – not an affiliate link) at $0.82 per 12 x 12 page before shipping and sales tax.  The price is double at Amazon.

I’ll post again with more updates as the experiment progresses!

Day 6: The Ranger Tim Holtz Distress heavystock is splitting into two layers. The American Crafts Vicki Boutin mixed media, Strathmore watercolor, and Arteza watercolor papers are still floating.

Keep your craft space tidy with this one easy tip

You can keep your craft space tidy by looking at it in its messy state and analyzing what is out that makes it messy. Is it stamps? Paper? Ink pads? Think about the last time you cleaned up… what was left at the end when you ran out of steam?

For me, the issue is always scraps of paper and stamps/dies. I can keep up with the ink pads and markers, the glue and punches, but I’m always left with a pile of paper scraps and can’t ever seem to get the stamps and dies put away.

I’ve started using a three-box method to keep my craft space tidy all the time.

One box is for the paper scraps – the leftover bits of inky backgrounds, scraps of patterned paper or cardstock, or extra die cuts. One is for stamps, dies, and stencils. The third is for everything else that needs to be put away. I can clean off my work surface into these three containers, and then efficiently put that stuff away as time permits.

I’m striving to make this a no-shopping year for craft supplies, and part of that effort is using what I have. This approach has really helped me use the supplies and not focus on the thought “oh, I’d make something but it will make a mess” or not being able to find what I want to use.

I hope you can adapt this tip to your crafting style, and that you find it useful!

Alphabet dies need magnet sheets

The one type of die that really needs a magnet storage sheet is alphabet dies. The magnet sheet helps you keep track of each die so you aren’t left with a less-than-26 letter set.

I have had to dig through the recycle bin more than once looking for a die that got mixed in with the paper scraps, but without a magnet sheet I would not have realized it was missing until too late!

There are several purpose-made craft storage solutions, including Lawn Fawn, Totally Tiffany, Sizzix, Hero Arts, Crafter’s Companion (and more I’m sure), but plain magnet sheets are also readily available. The one pictured is this one https://amzn.to/3Op6oRl that runs less than a dollar per 5×7 sheet. I usually pair them with DVD storage sleeves for a bargain approach.

My favorite use of scraps

I’ve tried many tips to use up scrap paper, but after trying them all I’ve settled on my favorite way to use up the edges of inky projects and tiny pieces of cardstock, vellum, and even wrapping paper. I use them to make personalized gift tags and bookmarks.

Everyone loves something personalized, so these have been very popular. I use them at the holidays and all year long for birthdays. The only tool required is letter dies.

Finding bargain craft tools

Have you ever compared the price of a women’s disposable razor to the price of the same thing sold for men? Or been part of planning a wedding? If so you are aware that prices can vary widely based on who is buying the product. The rule of thumb is that the larger the market, the smaller the price.

When we apply that principle to craft tools we can find some bargains.

In the kitchen section

  • Baking mats – Thick silicone mats, sometimes called silicone pastry mats, are similar to “water media mats”. My favorite is this one https://amzn.to/3nDdM0r
  • Muffin tins – Handy for sorting small items, especially six-cup or mini-muffin tins. I like the individual silicone cups like these https://amzn.to/3nDdM0r
  • Plate rack – Handy for holding vertical items like scoreboard, stamping tool, palettes, and similar small items that don’t stack neatly. I’m using this one https://amzn.to/3nDdM0r
  • Dough scraper – Fabulous for applying paste across a stencil, and with an inexpensive multipack you can actually leave one in the kitchen for dough! https://amzn.to/3nDdM0r
  • Lazy Susan (turntable) – So useful for storing items in a hard-to-reach corner, whether that’s inside a cabinet (as intended) or on the corner of your craft desk https://amzn.to/3nDdM0r

In the office section

  • White board erasers – Use this instead of a specialty stamp pressure tool (to press on the cover of a stamping tool). I got a package of cute ones that are magnetic to boot https://amzn.to/42yAHcd
  • Magazine holders and paper sorters – These are, after all, the same size as 8 1/2 x 11 craft paper so why not? Cardboard magazine holders are particularly inexpensive. For 12 x 12 paper, you can construct your own magazine holder with almost any corrugated box and some hot glue.
  • Glue – When it comes to craft adhesive, the majority of the price is in the dispenser. If you are buying glue tubes or fine-tip bottles, you can save a ton by decanting Elmer’s Extra Strong or Aleene’s Tacky Glue into smaller bottles like these https://amzn.to/42yAHcd

In the makeup section

  • Nail polish organizers – Perfect for 1-ounce bottles such as reinkers or drops, or the 1-ounce needle-nose bottles I use for glue.
  • Make up brushes and sponges – Instead of craft blending brushes or pouncers, try the mass-marketed makeup versions. The ergonomic blending brushes (palm hold instead of handle) are usually called foundation brushes.

#GetMessyMay 2 showing up

My entrance to papercrafting was traditional scrapbooking back in the early ’90s, so I’m taking a scrapbook approach to this month’s journal. For prompt #2, showing up, I chose a vintage pic of my three dogs waiting at the front door for a visitor to show up.

The left side is a magazine cover, with gesso and stenciling, and the right is the paper from the bottom of my splat box.

Might as well use some of that overspray! Tomorrow’s prompt is “happy.”

#GetMessyMay starting

I’m going to participate in the journal challenge #getmessymay. The prompts are

And for prompt #1 starting I choose to put together a junk journal from a Pink Paislee wood album that was a cross-promotion with Tattered Angels, something that’s been in my crafty stash so long it pre-dates the acquisition of Pink Paislee by American Crafts in 2013. It’s part of my challenge to myself to use what I have and not shop. For pages, I’m using various colors of copy paper, some magazine pages, and some paper bags. The journal-in-progress:

Short video here: https://youtu.be/3LciYXShq8Y

Your craft space can look better in an hour

We don’t all have the time or money to install a custom craft space, but you can create a co-ordinated look with your paper craft skills. A consistent label can unify many different types of containers.

You can see in this photo I have fifteen different types of containers. I used whatever I had around the house – mostly shoe boxes in cardboard or plastic, but a couple of smaller containers from the dollar store, and some kitchen organizers.

You can (obviously) create your own labels, but I’m attaching mine in case you’d rather print those than make your own.

You can fussy-cut to keep the shape, or cut in a straight rectangle in the interest of speed. I’ve included a couple of blanks in case your categories don’t match my categories.