It’s very easy to use a template to make your own envelopes. While I wouldn’t want to make hundreds this way, it’s a fun creative element to add to your handmade cards. The advantage of templates is that you don’t need any special tools – just scissors and glue – and can use any type of paper.
You can make your own template by carefully unfolding an envelope and tracing it onto heavy paper. If you would like to use one of my templates, you can download this PDF of three sizes: an A2 announcement (side flaps, fits on 8 1/2 x 11 paper), an A1 (or 4 Bar) baronial, and a #17 “Mr & Mrs” that’s perfect for gift cards.
The sculpture and original art are by Robert Indiana. This piece started its public life as a Christmas card sold by the NYC Museum of Modern Art beginning in 1965. The first sculptural version dates to 1970, was made in aluminum, and is on display at the Indianapolis Museum of Art. If it looks familiar to you even though you don’t go to art museums much, it was also a US stamp. (8 cents – probably 1971-1974) There are versions all over the world and in multiple languages. “Amor” is on display in Washington DC, Milan Italy, and Philadelphia PA. “Ahava” is on display at the Israel Museum Art Garden in Jerusalem.
The typeface is “Didone” but any serif alpha will be close. A serif is the little thick bit attached to the end of a letter. The font that is used in this description box is a sans serif font. Most newspapers and magazines use serif fonts in the body of articles, since most people find it easier to read. (Recent research, however, suggests that dyslexic readers have better comprehension with sans serif fonts.)
Instructions: Cut the letters using two different dies, 10 of each letter per die. Stack those up, gluing the letters together, then use acrylic paint on the edges – first white, then metallic gold. Layer one more letter on the top after painting. Arrange letters on blue and green background (to mimic the most common color pattern used on the sculptures) then adhere to card front. Background can be made using ink direct-to-paper or acrylic paint swiping.
Prices are current as of the day I typed this out (obvs.) Amazon links (if any) are affiliate, others are not. As an Amazon Associate, I earn from qualifying purchases. Or I would, theoretically, if anyone ever followed a link and bought something, which I guess might happen someday.
Use a variety of circle punches to punch 3 to 5 circles in various pieces of scrap paper. I used a 2 1/2”, 1 3/4”, 1 1/2”, 1 3/8”, 1 1/4”, and 1” punches. The 1 3/8” punch was too close in size to the 1 1/2” and 1 1/4” punches so I should have omitted that one. Cut the circles in half, stack them up, and glue them down in a pleasing arrangement. For the green and yellow cards, I punched an extra 1” piece and left it whole to put on top.
For the orange card, I used one 2 1/2” punch and one 1 3/4” punch in two different colors (so 2 large circles in 2 different colors, 2 medium circles in the same 2 colors) and three 1” circles in a third color. The large and medium circles were cut in half.
Punch a Bunch
The tiny grid is a 1/2” punch, 66 times. The large grid is a 1” punch, 9 times. The shingle card is a 1” punch, 30 times. The party garland is a 1/2” punch, 27 times.
Line ‘Em Up
The purple negative space is a 1 1/2” punch, 3 times, in a 2” wide strip with decoration by a 1” punch, 4 times, and a 1/2” punch, 7 times.
The pink line is a 1 3/4” punch, 5 times.
The aqua and olive patterned paper is a 1” punch, 10 times.
The yellow paper is a 2 1/2” punch with a 1” circle punched out. I used the same 1” punch to punch three holes in the card base. The clear layer is decorated with a 1/2” punch, 3 times.
Supplies
The punches are mainly from Stampin Up, all in discontinued sizes. Their current line includes a 2 3/8” (6 cm) punch for $22 (https://www.stampinup.com/products/2-3-8-6-cm-circle-punch) as well as a 2” and 1 3/4” for the same price, but frankly if you don’t already own punches (or can’t find them used) I’d opt for circle dies as a much more cost-effective choice. I’m grateful to have been given many punches, cast off by JM, the mother-in-law of the daughter of a friend of a friend (yeah, that’s quite a chain). These do often turn up used because they don’t often break or wear out, plus they are heavy and bulky to store.
Here’s an example of a nesting circle die set for $8.59 https://amzn.to/48d9xe3 that includes 21 different sizes. That’s quite a contrast to the cost of punches.
I am a macro sorter; if you are not, this approach is not for you. I put all the warm color paper scraps in one bin (red, orange, yellow), cool colors (green, blue, purple) in another, then neutral (white, brown, black), and finally metallic / special (e.g. vellum).
Prices are current as of the day I typed this out (obvs.) Amazon links (if any) are affiliate, others are not. As an Amazon Associate, I earn from qualifying purchases. Or I would, theoretically, if anyone ever followed a link and bought something, which I guess might happen someday.
I’m working in my 2024 planner that I’m creating following the prompts of #junkjournaljanuary hosted by Meg at Megjournals in collaboration with Get Messy Art. Sign up for free here to download the prompts and grab your printable! https://getmessyart.com/peek/jjj/
The prompts I’m following are 6, 7, 10, 14, and 19:
Memory
Stitched
Layered
Pattern
Interactive
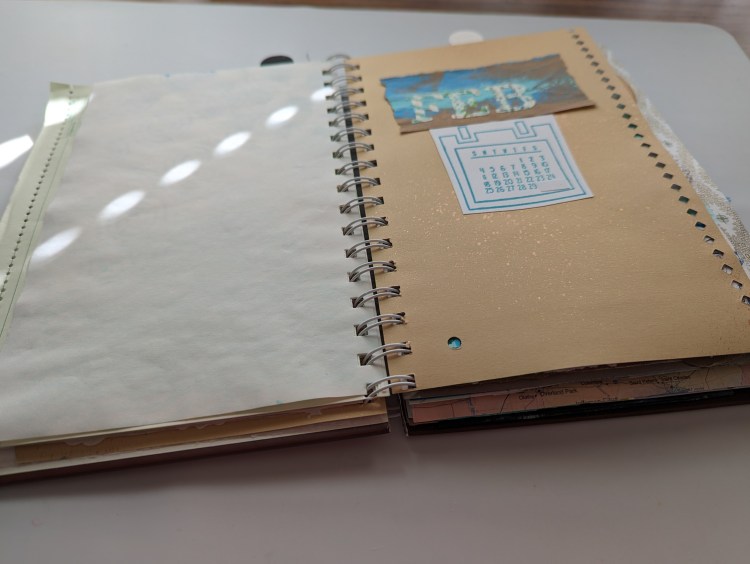
The cover page is the month title.
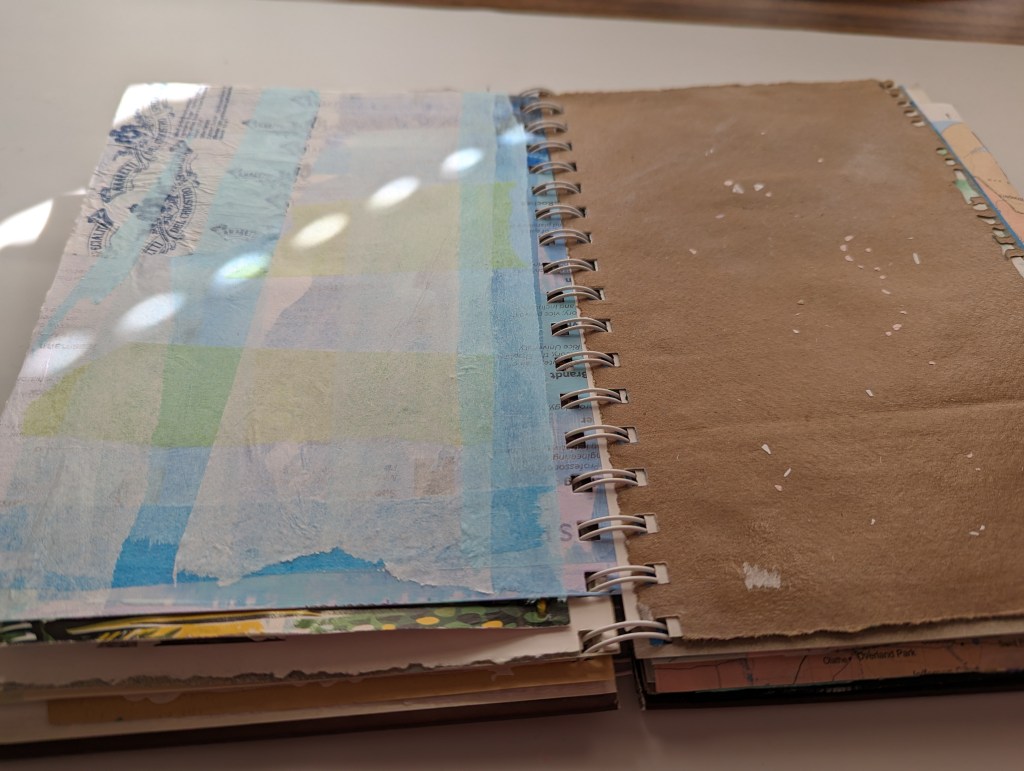
This is following the planning spread. The left page is a layered, stitched page with a decorative top layer, then a window tuck spot and a glassine bag pocket. This serves as an interactive element.
I die-cut the layers with a border die and sewed them together with embroidery floss before adhering. The right-hand page is the memory (and future plan!) for one of my favorite nights of the month – pizza night! My husband makes homemade pizza from scratch and we watch our favorite TV shows. This used to be a weekly event but my in-laws moved here during the pandemic and don’t like to have pizza quite so often. The pizza and TV die cuts are layered on some decorative paper that reminds me of wallpaper.
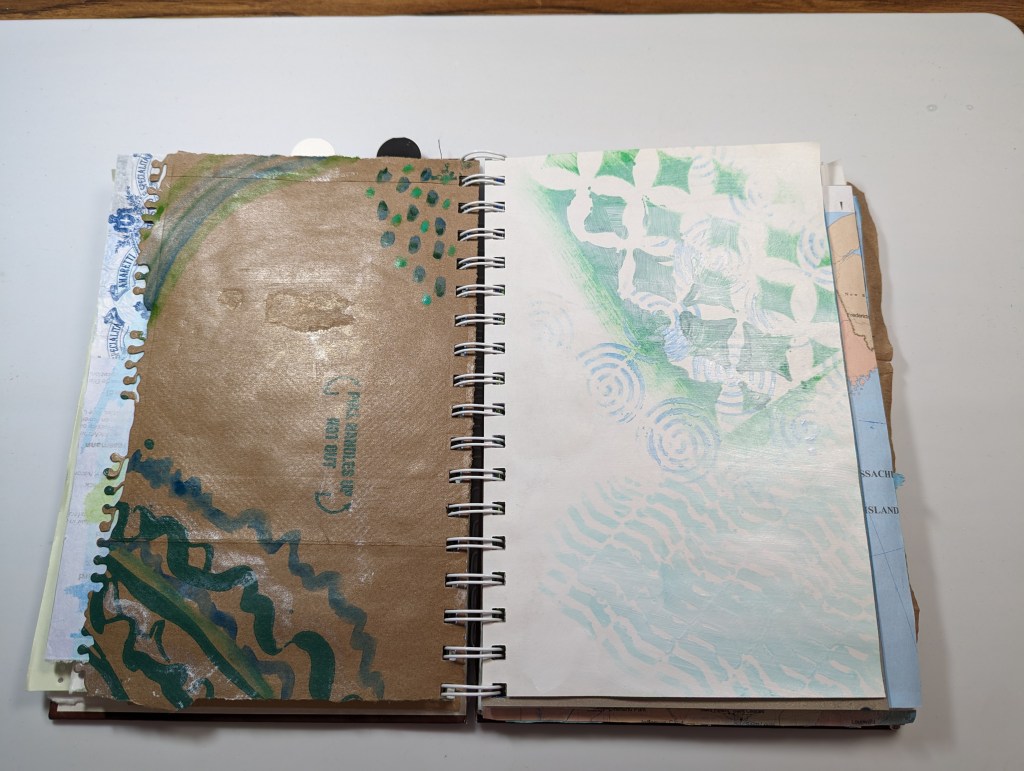
The next pages are available for journaling as the month goes on.
Month titles, lightbulb, TV, and pizzas are items I made during the Dephemermeber 2023 challenge hosted by 49Dragonflies and Luise Heinzl.
The letter dies are Pinkfresh Studio Julieta, which was a fall freebie from Scrapbook .com.
The border die I used for stitching holes is Heffy Doodle HFD D245 Lovely Little Border Dies. This one seems to be discontinued, but Brutus Monroe has a whole set called Stitched Borders which is $19.99 https://www.scrapbook.com/store/bmp-bru5680.html
The large shaped tag in the glassine bag is an old Stampin Up steel rule die, Top Note.
Prices are current as of the day I typed this out (obvs.) Amazon links (if any) are affiliate, others are not. As an Amazon Associate, I earn from qualifying purchases. Or I would, theoretically, if anyone ever followed a link and bought something, which I guess might happen someday.
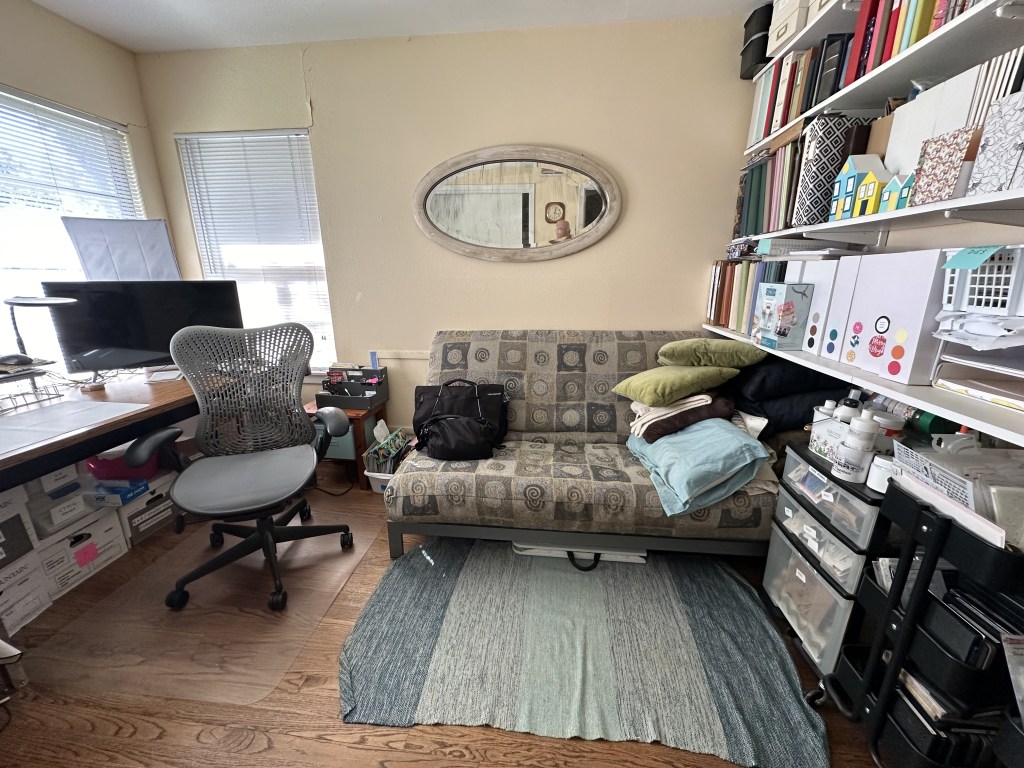
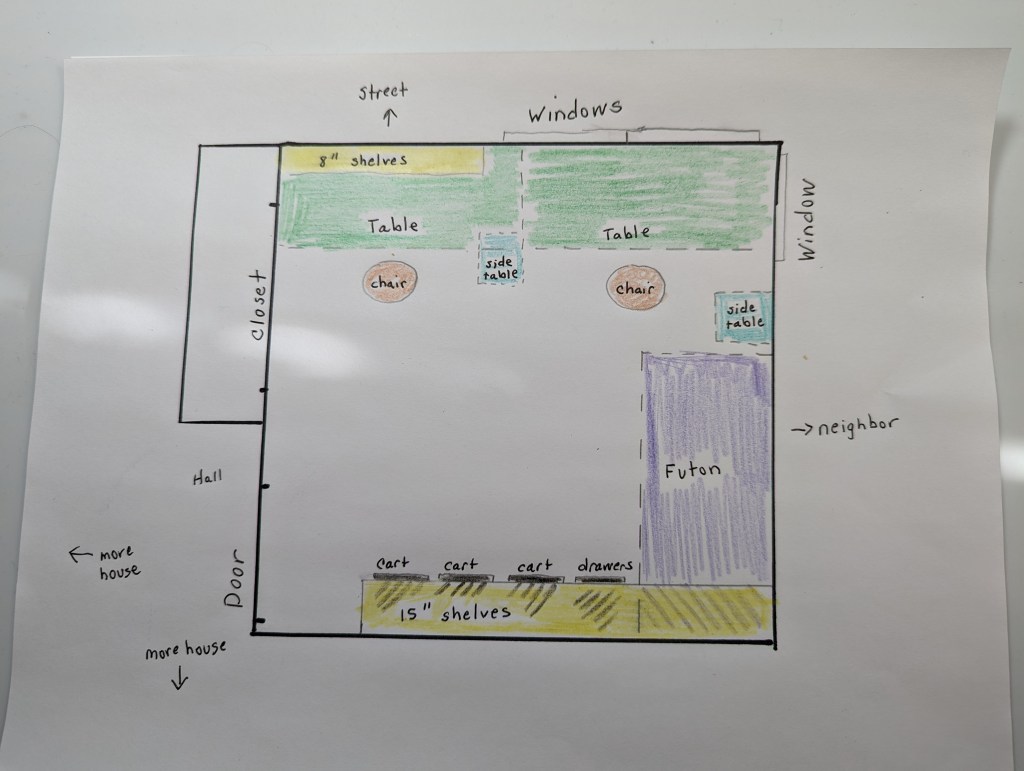
Room is about 11.5’ x 11.5’ and it serves as guest bedroom (hence the futon), work from home office, family records storage, and craft space. That’s 3.5 meters per side, or 12.3 square meters. It’s 132 square feet and is, to be best of my ability to determine, dead average size for a secondary bedroom in the US. This room was filled piecemeal, so no matching custom cabinetry here – it’s mostly low-cost storage.
The largest expense was the shelves. These are modular hanging system with solid shelves (wood covered with white laminate), readily available at big box home improvement stores although the solid shelves are not always an option. This is a modular hanging system with solid shelves, readily available at home improvement stores. Similar set-up today would cost about $1200. This is Elfa, but the prices are pretty similar to Closetmaid at Lowe’s. It’s eight vertical tracks, 32 brackets, and about 50’ of shelves.
The finished albums and journals are on the left side, since that’s hard to reach over the futon. The top shelf holds photo boxes. Every box on the shelves is labeled with a large, easily read, accurate tag. I can read these from across the room.
The cardboard magazine holders for 8 1/2 x 11 paper came from the office supply which is much cheaper than craft storage. The 12 x 12 magazine holders came from Scrapbook com. Each spine is labeled with the paper color, and I use crumpled paper or the air bags from shipping to fill in any loose spots so the paper stays vertical(-ish.)
White cardstock 8 1/2 x 11 is in office paper trays, separated by weight.
I analyzed my issues with cleaning and found that when I picked up the room I ran out of steam / interest with a pile of paper and a pile of stamps and dies left so I made a tidy-up bin for each of these categories. The bin on top of the white cardstock is the stamps and dies that need to be re-filed.
I buy card bases ready-made from The Paper Mill Store. The Desert Storm is available in envelopes, but I had the cardstock custom cut and scored and folded it myself. Their prices are very reasonable if you need bulk volume.
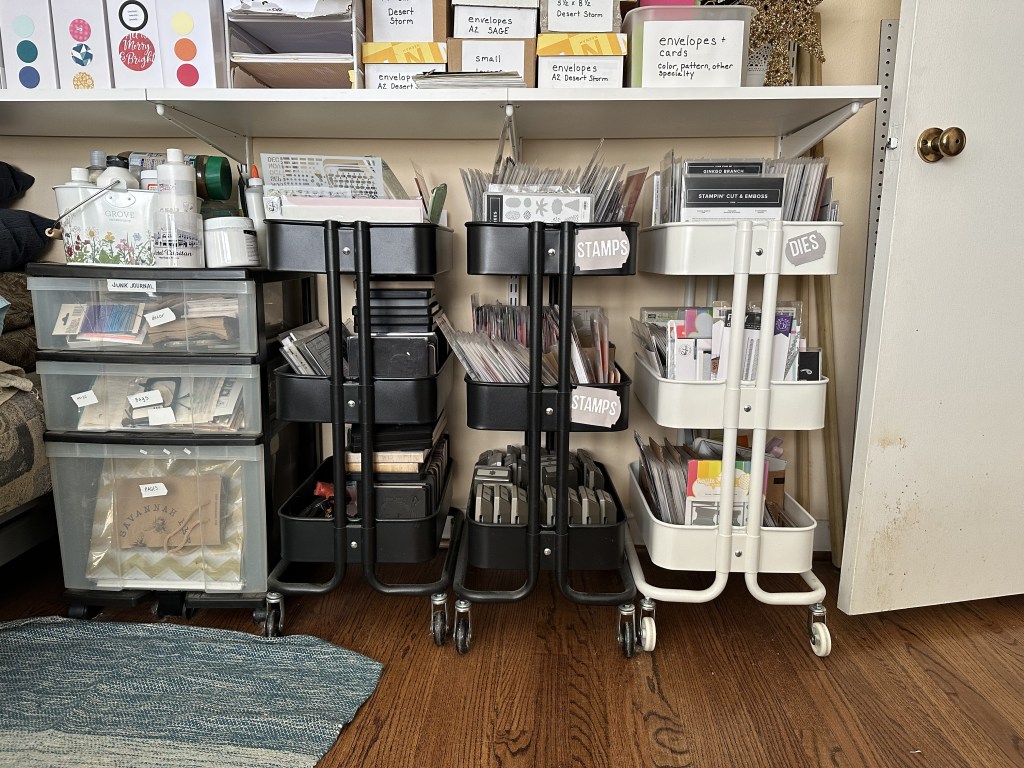
The next most expensive storage item is the carts. I’m using three Raskog carts from Ikea, currently $40 apiece. I like these for stamps and dies especially because I can roll them over and flip through all the items. I’ve got a significant number of punches and steel rule dies on these carts and they are sturdy enough to handle the weight. Those are not easy to flip through, so for those I rely on a swatch book.
The stamps and dies are grouped by clear stamps, rubber stamps, clear stamps with matching dies, standalone dies. The dies are grouped so that all of one word are together, all word dies are together, all cover dies are together, and so forth.
Under the futon I have a folding table. This is adjustable-height and the lowest height is about 20” which is perfect as an extra work surface or drying surface.
Work tables bought used from work, steel with laminate tops, 5.5’ long 2.5’ deep. These would be about $200 new if you opt for metal but used tables were $5 each. I bought four. I have some large silicone baking mats and smaller silicone placemats down for any crafty mess; since these are meant for the kitchen they were inexpensive.
One task chair was cast off from work when we moved offices, the other I bought when my crafty friend Denise complained that my 40 year old desk chair my mother bought me in college was too hard.
The small tables are a pair of old Ikea night stands (that they no longer sell) that are 14” square and 18” tall. The 18” height is perfect for die-cutting from my work chair. My tidy-up paper bin is on the shelf for this table.
The shelves on this side, over the tables, hold a variety of different boxes and bins. That’s 14 different styles of containers. I added consistent labels to bring some visual cohesiveness. I’ll link to my blog where you can download these labels if you want them. The vertical storage spot is from the kitchen section and holds my stamp platforms, embossing tray and similar items. The plastic bowl holds my stamp-cleaning chamois.
The mini-ink pads are labeled by color group. I consistently use punched shapes in color paper to indicate anything sorted by color.
The next highest cost storage is the ink pad storage. I’m using two units of Best Craft Organizer Porta Ink Dual Swivel Traveler (https://www.scrapbook.com/store/bss-300pi1002.html ). The “traveler” part is the optional strap which I have not attached. These are currently $90 apiece and each one holds 48 ink pads. I bought one and I was given one when Denise remodeled her whole craft room and no longer needed hers. Denise had her whole room re-made by a closet company – it’s a palace!
On the desktop I have a couple of lazy susans from the kitchen section. These have some mugs and bowls and empty tin cans holding brushes, frequently used tools, adhesive and so forth. The frame on the wall holds my crafty pins.
Under the tables I have my sewing machine, a travel bag (a Christmas gift from Denise), and a bunch of cardboard boxes. Some new, some cast off from work during the last move. Labeling is KEY for opaque boxes. If you don’t know what’s there, it’s lost. Might as well throw it away. My paper trimmer is on top of the boxes, easy to grab by the handle.
In the closet on the right side it’s mostly craft stuff. The plastic bins and drawers have the same labels as the bins on the shelves.
The faux Kallax four-cube shelf is from Target, but the prices at different retailers are pretty similar. The bottom shelf holds wood-mount stamps and magazines. The top shelf has some dormant projects, rolls of paper and Contac paper, and a crop bag of smaller tools. The vertical area is mostly chipboard, and the bookend is my long-reach crop-a-dile.
The top closet shelf and area to the right of the Kallax are not craft supplies. It’s mostly gift wrap, mending kit and stuff like that. The area to the far left is mostly old tax returns and similar records.
On the left side of the closet there is much less craft stuff. There are two boxes that hold miscellaneous craft kits and bits and empty small craft containers. On top of that are a group of plastic bins. some i bought new, some were cast off from work when we disposed of the microfiche. These are mostly paper scraps sorted by color, junky stuff for junk journals, and chipboard.
Purge. Anything you are rejecting over and over, or moving out of the way to get to something you want, is something you should pass on to someone who would use it.
The best storage is the storage you already own or can find used. Use what you have and label well.
The larger the shopping audience the smaller the price. If you are shopping for storage, start in office supply or kitchen supply and only then turn to craft supply. Embrace cardboard and ziplock bags.
Prices are current as of the day I typed this out (obvs.) Amazon links (if any) are affiliate, others are not. As an Amazon Associate, I earn from qualifying purchases. Or I would, theoretically, if anyone ever followed a link and bought something, which I guess might happen someday.
Today’s friendship bracelets are usually braided from embroidery floss; some of the designs are really elaborate and beautiful. Back in my younger days, though, it was all paper gum wrapper chains. Not much gum is sold in sticks now, and the gum sticks don’t have individual paper wrappers, so I used lightweight paper and cut my own pieces to 1” x 2 3/4”. (That’s 2.5 cm wide by 7 cm tall.) Any size is fine as long as it is this ratio 1:2.75 and each piece is consistent. Any paper is fine as long as it is very lightweight. Copy paper at 20 lbs is too heavy. I’m using origami paper in the video.
Fold the paper in half so you have a strip 1/2” x 2 3/4”. Open the paper. Fold each side into the crease. Now you have a piece 1/4” x 2 3/4” that is four thick.
Fold in half the other way. Open the paper. Fold each end into the crease. Now you have a piece that is about 1/4” x 5/8” and eight thick.
Do this a bunch of times, then build the chain by inserting the legs of one piece into the loops of the next piece.
26. FORGOTTEN SNACKS
These round tins of La Vie de la Vosgienne fruit pastilles were something my father would bring me and my sister. Not sure if the product is discontinued or no longer imported from France to the USA, but these are no longer available to me except as a memory. I guess that’s the opposite of a forgotten snack? But this is what sprang to mind for me.
To make the shaker you need a small zipper-top plastic bag. You want the bag to be just a smidge larger than the interior of your frame. If your bag is too big, cut it down with scissors and tape up the side with clear tape. Easiest shaker ever, no special equipment or foam tape!
27. SPAGHETTI BOX WINDOW
The pasta we use doesn’t have a window, but the candy I bought at Aldi for stockings does have a window. I cut six panels of cardstock in A2 size (4 1/4” x 5 1/2”) then die cut the center using the Sizzix for Stampin Up die Top Note. (Any die larger than your window would work, or heck use a die smaller than your window.) I sandwiched the window panel of the candy bags between two dies then decorated the front panel with paper flowers to obscure the package labeling.
28. ME & MY CRUSH
I used a lightbulb instead of a heart because it’s important to think about whom you marry!
Edison lightbulb die is Sizzix Bigz Tim Holtz Filament
Prices are current as of the day I typed this out (obvs.) Amazon links (if any) are affiliate, others are not. As an Amazon Associate, I earn from qualifying purchases. Or I would, theoretically, if anyone ever followed a link and bought something, which I guess might happen someday.
I have an Apple Numbers version but WordPress says “nah.” You can email me at crystal@papercraftcrystal.com if you would like that version.
Most craft glue is white glue, a polyvinyl acetate emulsion in water. It works on porous materials like paper, fabric, and wood. The water needs to evaporate, so this is not the best choice on non-porous materials like plastic. There is a bewildering variety of types, brands, and sizes available. Is craft glue better than school glue? Yes. Is it FORTY TIMES better? I don’t think so, and yet the price per ounce varies from 40 cents an ounce to nearly $17 per ounce.
Bottom line, you are paying for the dispenser more than the product. Glue pens are outrageously expensive, ranging from $4.37 / ounce (Aleene’s) to a staggering $16.63 (Nuvo Smooth Precision.) If you prefer a small tube, your best bet is to buy empty tubes and fill them yourself. There’s a link a the end to a helpful tutorial on YouTube (by someone else) showing that process.
If you can handle a larger bottle, 2 to 4 ounces, I’d suggest the Scrapbook .com, Bearly Arts, or Art Glitter products sold with tip kits. You can refill these almost endlessly with any glue.
Elmer’s and Aleene’s are the low-price options, mostly ranging from 40 cents to $1.03 / ounce. Art Glitter, Bearly Arts, Reptile, and Scrapbook .com Artis are the next tier mostly ranging from $1.32 to $2.70 / ounce.
There is certainly a place for special-purpose adhesive (like Tack It Over and Over or Tombow Mono Multi) as well as different application methods. I use a jar of multi medium gel just as often as a needle-nose bottle. I want to highlight this information so you can make the best choice for you and your crafty dollars.
There is a similar range for dry adhesive – tape runners and dot runners. The prices I found range from 1 cent per foot to 16 cents per foot. The implied price of the dispenser ranges from zero (tear tape) to $23 (ATG). These calculations can help you be mindful of the cost of the plastic housing.
Prices current as of the day I typed this all out (obvs) and do not include sales tax, shipping, or coupons.
A quick review of sixteen ways to build a mini-book or bind a junk journal.
Mini-books are a fun way to show off your paper crafting skills. I love to use these as mega-cards and mini-scrapbooks. Junk journals are a great way to use leftovers from other paper crafts, junk mail, and old magazines. A junk journal can be a written journal, a visual journal, a commonplace book, a smash book, a foldaway vision board, or all of the above.
There are many, many ways to do this. Let’s look at some binding methods, starting from the least amount of equipment and supplies required to the most. After each section I have linked to longer tutorials by other people on the binding methods.
Make a long strip of paper, attaching more and more using glue. Fold back and forth into an accordion, with each flat the desired page size. It’s best not to but the attachment at the fold point.
Fold each page into a U-shape, with each U increasing in size. The spine or cover should be the largest U. Nest the pages in order by size and attach by gluing at the U.
Put loops of thread, twine, or elastic cord around spine or thread through spine to leave loops inside the cover. Folded pages go around each loop, Easier to work with elastic!
Check the channels for Elizabeth Craft Designs, Tonic Studios, Anna Griffin, Eileen Hull, Art Impressions, or whoever made your specialty die set for more instructions, or use the YouTube search feature to enter the name of the product and find a new favorite channel!
Resist tag – use a white crayon to write the recipient’s name on a white tag, then add a little watercolor paint. This will work best on heavier paper like a 3 x 5 index card rather than thin copy paper.
Photo tag – use a photo of your recipient printed on normal printer paper, cut out their silhouette, and adhere to your tag with a glue stick. If you don’t have a photo, remember that your grandma looks just like Viola Davis or Christie Brinkley, and grandpa looks like George Clooney or Idris Elba.
Use the supplies you have around your house. I’m linking to the crayon options below because I think the fact they exist is fascinating. Who knew?
If you are not working on white paper, there are also clear wax crayons such as these from Brusho, 5 for $7.90 at Blick https://www.dickblick.com/products/brusho-wax-resist-sticks , which are also a better price than Amazon. The search term is “wax resist sticks.”
YouTube and Instagram: papercraftcrystal
Prices are current as of the day I typed this out (obvs.) Amazon links (if any) are affiliate, others are not. As an Amazon Associate, I earn from qualifying purchases. Or I would, theoretically, if anyone ever followed a link and bought something, which I guess might happen someday.
I removed the tabs since I’m not building the 3-D version and built the Halloween House and Christmas House using contrasting color palettes. The Halloween version is spooky orange and dark gray, while the Christmas version is warm brown and welcoming golden glow. I used other die sets from my craft supplies to add accessories.
For the Kintsugi House I cut two of the same house front from Paper Village, removed the tabs, and then tore one copy in half. I used Ranger Tim Holtz Foundry Wax on the “broken” edge and set it with a heat tool.
Sizzix items are almost always less when buying from Sizzix on Amazon than from their own website, so always check. Sizzix does offer a 15% off coupon for email signup, but Amazon offers free shipping.
Additional elements from Lawn Fawn scalloped treat box add-on sets and Spellbinder’s Garden Gate.
Anyone from Dallas will recognize the neon flying red horse. The sign originally stood on the top of the Magnolia Oil building downtown (1934-1999) and was later reinstalled in front of the Omni Hotel (2015).
Trying to trace the mergers and acquisitions and spin-offs of oil and gas companies is like trying to follow the family trees on Game of Thrones. However, Magnolia Oil was founded by the Sealy family of Galveston and the symbol of the red pegasus came from the Vacuum Oil company of New York. Both are now part of ExxonMobil.
Sizzix items are almost always less when buying from Sizzix on Amazon than from their own website, so always check. Sizzix does offer a 15% off coupon for email signup, but Amazon offers free shipping and that can be significant on Bigz steel rule dies.
There is a related matching shaker dome if you are interested, item #664920 which is $6.99 for six ( https://amzn.to/3ReyoIo ) but you don’t need that to make a shaker, especially from a steel rule die. It’s so easy to cut multiples of the shape to make your shaker well, then any clear material can cover the TV screen opening.
Bender the robot is a character from Futurama, a hilarious workplace comedy currently streaming on Hulu. It’s been seven seasons across 26 years on three networks, returning after cancellation (Fox, Comedy Central) and failed syndication (Adult Swim, Syfy) again and again. Look for the episodes featuring John Goodman as Santa Robot and Coolio as Kwanzaabot. Produced in partnership with 30th Century Fox.
Prices are current as of the day I typed this out (obvs.) Amazon links (if any) are affiliate, others are not. As an Amazon Associate, I earn from qualifying purchases. Or I would, theoretically, if anyone ever followed a link and bought something, which I guess might happen someday.